
Over time tons of discord bot tutorials have been published, but if you follow them they don't help you to build a functional bot because many of the packages used in them are updated and no longer support older syntaxes.
Here is the full guide to creating your own Discord Bot in 2023 with Python.
STEP 1: Create a Discord account
First of all, we have to set up a developer account to create the bot. Actually, you can use your ordinary discord account to access the discord developer portal, but it is highly recommended to create a separate account for development purposes.
You can create a new discord account with this link: https://discord.com/register
STEP 2: Create a new Application
After creating the discord account, you have to go to the discord developer portal and sign in with your newly-created discord account.
After signing in, go to this link: https://discord.com/developers/applications/
and click on the New Application button in the top right corner.

Then you can give a name you like to the new application.

After checking the Terms and Conditions you can hit the Create button.
STEP 3: Build-A-Bot.
Select Bot from the left sidebar and hit the Add Bot button.

After confirming you will be redirected to this page:

STEP 4: Giving Powers
Then you can give the permissions to the bot. More information about the Intents can be seen under every toggle button.
For this tutorial, I will only enable message content intent as this bot is going to interact with the messages.
You can change them anytime you want.

After giving the necessary permissions, hit the Save Changes button.
STEP 5: Adding the Bot to a Server.
Finally, we have to add our bot to a server when we can test it. So, it is highly recommended to create a new server and add the bot to it.
To create a new server follow the instructions below:
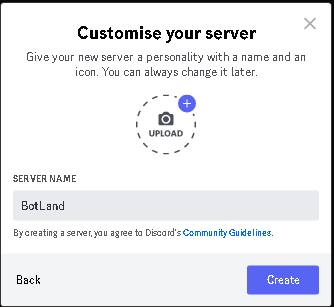
Click on the + button to add a new server

Then select create my own, after selecting a category or skipping the question, You can give a name you like to the server.
Then go back to the developer portal Click on OAuth2 > URL Generator and tick the necessary checkboxes shown in the following picture.

Then copy the link at the bottom of the page and paste it on a new tab and hit enter.
After selecting the server that you want the bot to be added to click continue.
Then you can authorize the bot and after the human verification, you would be able to see your new bot in your server.

The bot is on your server
That's the basic and now we have to write our code. I will talk about it soon in another tutorial.
Thanks for reading and please subscribe to our youtube channel for the next tutorial.
Comments
Post a Comment